Help & training
Step by step, in the order you will need it.
Your first day — 8 steps
From a new account to a signed proposal and a cut sheet. Your first job is free: the Estimator, the 3D Designer and the cut sheet, all on that one job.
- Open your account. On the site press Open an account → company name, your name, email, password → Create account → type the code we email you.
- Add a card. You land on Billing → Add a card (Stripe). Nothing is charged now — you pay only when you buy something, and you see the price first. Cancel any time. Then you are in: your 3 sample jobs to look around — they can't be sent or printed for a customer.
- Your company. Home → Setup → 1 · Company info (Save company info) → 2 · Logo & colors (Upload logo) → 4 · Terms & text (Save terms). This is what your customer sees on the proposal.
- Your prices. Setup → 3 · Pricing. Fill the boxes until the bar turns green, then Save price book. The 17 prices, one by one.
- Your first job. Estimator → Jobs → + New Job. The Easy Estimator opens: one question a page → See the price › → 💾 Save to the job. Easy Estimator.
- Show it in 3D. Cage Designer Pro on the same job. The Easy Designer opens → From the estimate → check each page → Show it → Save to the job ✓. Easy Designer.
- Send it. Back in the Estimator: Preview → 💾 Save Version → E-Sign: sign in person, or ✉️ Send for E-Signature. The full Estimator.
- Cut it. Cage Layout Pro on the job → Easy entry (one question a page) or the full page → See the price → the cut sheet. Easy entry · Buying a cut sheet.
Stuck on any step? Email [email protected] with the job number.
Set your prices
One page. Do this once and every cage prices itself.
Where: Home → Setup → 3 · Pricing. A bar at the top tells you how many prices are still missing. Click Show them and it takes you to each box. When the bar turns green — "A cage prices itself: no line will ask for a price" — you are done. Click Save price book.
These are YOUR numbers. Nobody else sees them. Change them any time; new estimates use the new numbers.
Before you start, have these in front of you
- Your last 5 to 10 cage quotes or invoices
- What you charge for a door, a picture window and each screen upgrade
- Your supplier's price list for screen and fasteners
The 17 prices
Rate cards tab — 1 price
| # | Box | What it is, in plain words | Where your number comes from |
|---|---|---|---|
| 1 | Cage base price | What you charge for a plain cage, per square foot of roof + walls (the roof over the deck plus every screen wall — the way the 3D Designer counts it). Leave "Sq ft of" on Deck + walls; only change it if you really price a different way | Take a past quote for a plain cage. Divide the price by the square feet you measured. Do it for three jobs and use the middle one |
House prices tab — 7 prices
| # | Box | What it is | Where your number comes from |
|---|---|---|---|
| 2 | Doors that come with a cage | How many doors are already inside your base price. Most shops: 1 | How you quote today — "includes one door" |
| 3 | Each door beyond the ones that come with the cage | The price of one more door | Your door line on a past quote |
| 4 | Upgrade a door to welded | What you add when the customer wants a welded door instead of a standard one | Your welded-door price minus your standard-door price |
| 5 | Picture windows | What you add for a picture-window wall. Easiest way: steps by length — up to so many feet is one price, the next size is another. Fill in Over the last step too, or a wide window will ask you for a price | Past quotes with a picture window, sorted by width |
| 6 | Triple Coated fasteners | What you add when a job uses these. If they are your normal fastener, pick Included, no charge | Your supplier's price, or how you quote today |
| 7 | Stainless Steel fasteners | The upgrade price for stainless | Your upgrade line on a past quote |
| 8 | Pro-Tech fasteners | The upgrade price for Pro-Tech | Same |
Screens tab — 9 prices
For each screen there is a wall price. Your everyday screen is Included, no charge. The others are what you ADD for that screen.
| # | Box | What it is | Where your number comes from |
|---|---|---|---|
| 9 | 17/14 HD — on a wall | Usually your standard screen: Included, no charge | — |
| 10 | 20/20 No-See-Um — on a wall | What you add per square foot of wall | Your upgrade price ÷ the wall square feet on that job |
| 11 | 17/14 Super Screen — on a wall | Same | Same |
| 12 | 20/20 Super Screen — on a wall | Same | Same |
| 13 | Pet Screen — on a wall | Same | Same |
| 14 | Florida Glass — on a wall | Same | Same |
| 15 | 17/14 HD — in a picture window | What that screen adds on a picture window | A past quote with a picture window |
| 16 | 17/14 Super Screen — in a picture window | Same | Same |
| 17 | 20/20 Super Screen — in a picture window | Same. No-see-um in a picture window uses this price too | Same |
Good to know: - Pet Screen or Florida Glass in a picture window uses that screen's wall price. There is no extra box. - A screen you never sell: pick Not sold.
Check it worked
- Home → Estimator → + New Job → type a customer → 💾 Save.
- Scope → Screen Enclosure → type a cage you have already quoted.
- Estimate. The price should be close to what you quoted. No line should say ENTER PRICE.
- If a line does say ENTER PRICE, it names the box. Go back to Setup → 3 · Pricing and fill it.
Other prices on the page
Concrete, carport, railing, roofs, gates, gutter and the rest are there too. You only need them when a job uses them. A line with no price is never guessed — the estimate says ENTER PRICE and you type it on that job.
Easy Estimator — a price one question at a time
What it is
The front door of the Estimator. A new job asks one question a page, with big buttons and a picture of the cage. It prices from your price book. A line with no price says ENTER PRICE — it never makes up a number.
Steps
- Estimator → Jobs → + New Job. The Easy Estimator opens.
- Answer each page, then Next: whose job (a name is enough — phone and email are optional) · what shape · the sizes · which sides are against the house · how tall · what roof · what walls · doors · which screen · colour · anything else on the job.
- Is this the job? — read it over, then See the price › → the price, line by line. ✎ Change a number to fix one.
- 💾 Save to the job (or Save to the job ✓ at the bottom) — or Save and open the full Estimator › to go straight to the estimate. You see "✓ Saved to the job."
Advanced › (top of the page) opens the full Scope page with every field. It asks first if you want to keep what you answered.
The mistakes people make
- "Lines have no price in your price book yet." Tap it to see which. Set each one once in Setup → 3 · Pricing and every job picks it up.
Easy Designer — the 3D one question at a time
What it is
The front door of the 3D Designer. It asks one question a page, in feet, and draws the real 3D beside it. Close enough to sell from — the exact tape is taken for the cut sheet.
Steps
- Open Cage Designer Pro on the job. A job with no 3D yet opens the Easy Designer. The first time on a job it asks to add 3D — the price is on the button (your first job is free).
- Start from the estimate? → From the estimate: the sizes, roof, walls and doors come in filled — you only check them. Or Start blank.
- Answer each page, then Next: the deck shape · the house sides · does the cage roof go over part of the house · wall height · roof · open walls (screen, picture window, clear view) · doors · colour.
- Show it → the cage in 3D on the house. Drag with the mouse to turn it. Change anything with Back, then Show it again.
- The house: 1 or 2 stories, colour, roof — so the picture looks like their house.
- Save to the job ✓. You see "✓ Saved to the job." The full Designer and the proposal show this cage.
Advanced opens the full Designer: a photo of the yard, snapshots, a turntable video, and drawing any shape by clicks.
The mistakes people make
- Changing an answer and not pressing Show it again. The 3D is from the old answers until you do.
- A bigger deck after 3D was bought. The size is locked to the job. Roof, doors, walls and colour can change.
The full Estimator
What it is
The Estimator prices a cage from your measurements and your own price book, makes the proposal, and gets it signed — all on one job. Price: $50 a month (your first job free).
Before the first job (once)
| # | Where | Do |
|---|---|---|
| 1 | Home → Setup → 3 · Pricing | Set the 17 prices (Set your prices, above). Done when the bar is green: "A cage prices itself". Press Save price book. |
| 2 | Setup → 4 · Terms & text | Type your own proposal terms and what your proposals promise. Anything left blank does not print. |
| 3 | Setup → 1 · Company info | Name, licence, logo. They print on the proposal. |
The full pages, step by step
The Easy Estimator fills these in for you. To type every field yourself, press Advanced › — these are the pages.
Jobs ──► Site Eval ──► Scope ──► Estimate ──► Preview ──► E-Sign
 + New Job   customer    size &    the price   Save       sign in person
             & site      shape     lines       Version    or e-mail a link
| # | Tab | What to press / type | What you should see |
|---|---|---|---|
| 1 | Jobs | + New Job | a new job card, number like 2026-0007 |
| 2 | Site Eval | CUSTOMER NAME, CUSTOMER ADDRESS, CITY, STATE, ZIP → 💾 Save Eval → Next → Scope Builder | the job card shows the name and address |
| 3 | Scope | under SELECT SERVICE MODULES pick 🏊 Screen Enclosure | the cage box opens: "The size and shape of this cage" |
| 4 | Scope | either Draw the shape (pick a shape, type the outside sizes, click the house sides) — or type WIDTH (FT), LENGTH (FT), WALL HEIGHT (FT) | e.g. 40 · 30 · 8. Leave DECK SQ FT blank (= width × length) |
| 5 | Scope | COLOR, GUTTER SIZE, SCREEN — WALLS, SCREEN — ROOF, FASTENER TYPE, DOORS (+ Add Door) → 💾 Save | |
| 5b | Scope | PAYMENT TERMS (THIS SCOPE) → pick a preset → 💾 Save | Do not skip: with no payment schedule, ✉️ Send for E-Signature refuses ("Cannot send: Payment schedule is empty") |
| 6 | Estimate | read the lines | a 40 × 30 × 8 box on the house: Screen Enclosure @ $<your rate>/sqft × 2000 sqft (roof 1,200 + walls 40 + 30 + 30 = 100 ft × 8 = 800) |
| 7 | Estimate | any line saying ENTER PRICE → type the price on the line, or set it once in Setup → Pricing (the line says where) | the top bar goes from "NEEDS PRICING" to none |
| 8 | Estimate | 💾 Save Estimate | Total: $… |
| 9 | Preview | read the "⚠️ Review Before Sending" box, then 💾 Save Version | the proposal, your name and logo on it |
| 10a | E-Sign — in person | the customer signs in the box → ✓ Accept & Sign | job moves to SIGNED |
| 10b | E-Sign — by e-mail | CUSTOMER EMAIL → ✉️ Send for E-Signature | "Emails the customer a secure link." When they sign, the job moves to "Signed — Need Deposit" by itself |
| 11 | after signing | try to change a price | locked — "To add or change work, make a new estimate for the added work." |
Example: $10 / sq ft × 2,000 sq ft = $20,000.
The 3 mistakes people make
- No payment schedule on the job. Send for E-Signature refuses. Scope → PAYMENT TERMS (THIS SCOPE) → pick a preset (step 5b).
- Lines left on ENTER PRICE. The estimate prices them at $0.00. Set the price once in Setup → Pricing and every job picks it up.
- Typing only the deck, not the walls. With no wall list, the walls are priced "as a box on the house" (3 walls). An L or a jogged house needs Draw the shape.
The full 3D Designer
What it is
The 3D Designer builds the cage in 3D on the house, puts it on a photo of the yard, and saves pictures to the job. Price: $100 a job (your first job free). No monthly plan needed. A card on file is needed. The lock: once bought, that job's 3D is locked to the size you typed. Roof, doors, screens, colour can still change. A new size = buy 3D again, or e-mail [email protected].
Steps
| # | Where | Press / type | What you should see |
|---|---|---|---|
| 1 | Billing | add a card (Stripe page) | "card on file" |
| 2 | Home → Cage Designer Pro | pick a job → Yes — work on this job | the "Confirm the job" card names the job |
| 3 | the 3D card | "3D is not on this job yet" · 3D Designer — $100 a job · press Type the cage size | the size box: House side (on the gutter) · Left and right sides · Wall height → Use this size |
| 4 | the card | "Size typed here: 30' house side × 20' sides, 9' walls. Change the size" | a rectangle only — another shape goes on an estimate first, or e-mail support |
| 5 | Add 3D to this job — $100 | read the notice: "Buying 3D locks this job to this size and shape." · tick This is the right size and shape for this job → Yes, add it — $100 | "3D is on this job, locked to 30 x 20 ft deck, 9 ft walls." Charged once. |
| 6 | the Designer | Roof · Front wall · Side walls · Cage colour → Show it | the cage in 3D on the house |
| 7 | Not four-sided? | Not four-sided? Draw the deck | |
| 8 | Photo | Put it on a photo → Choose a photo → tap the 4 deck corners 1-2-3-4 | the cage sits on the yard photo |
| 9 | Save | "Saved to the company" — pictures in the job's Docs | |
| 10 | Share | Save a snapshot (JPG) · Record a turntable video (MP4) | files with your company name on the picture |
| 11 | after the buy | the start form opens on the typed size, boxes grey: "Size locked … It was typed when 3D was bought for this job." Then type 50 on a side → refused: "3D on this job is locked to 30 x 20 ft deck, 9 ft walls. … You can change the roof, doors, screens and options — not the size." |
The 3 mistakes people make
- Typing the wrong size, then buying. The size locks. Read the notice's numbers before ticking.
- Tapping the photo corners out of order. The page says "the corners were probably tapped in the wrong order" — tap 1-2-3-4 going round the deck.
- Using the Scratch pad. "Scratch pad — saves nowhere". Pick a job.
Material Takeoff
What it is
Takeoff builds a material list from numbers you type off the drawings: carports, porches, sheds, cages. It does not read a plan set by itself — the page says so: "Reading a plan set automatically is not in Cage Contractor Pro yet." Price: free with a layout. You can save a takeoff on a job that has a paid Cage Layout Pro cut sheet. Building and printing a list works without saving.
Steps
| # | Press / type | What you should see |
|---|---|---|
| 1 | Home → Material Takeoff | "Fill in a structure and hit Build List." |
| 2 | Link to job → pick the job that has the cut sheet | "Linking makes the takeoff visible from the job." (it says "not linked" until you do) |
| 3 | + Cage (or + Carport, + Porch, + Shed) | a structure card |
| 4 | type the numbers off the drawings | — |
| 5 | ↻ Build List | the material list |
| 6 | read "Confirm before ordering" | check counts against the drawings |
| 7 | 💾 Save | saved on the job. Refused on a job with no cut sheet |
| 8 | Copy · .txt · .csv · 🖨️ Print sheet | the list for the supplier |
The 3 mistakes people make
- Ordering off the list without checking. The page says "Confirm before ordering". The list is only as right as the numbers typed.
- Saving on a job with no cut sheet. Refused: "The take-off comes with a paid cut sheet…". The cut sheet is bought on the Cage Layout Pro page.
- Not linking the job. The takeoff is then not seen from the job.
Complete — all 3 on a job, 15% off
What it is
With the Estimator on, a job that buys the 3D Designer and a Cage Layout Pro cut sheet gets 15% off.
- First job with all 3: 15% off the Estimator month + the Designer + the cut sheet.
- Every job after, while the Estimator is on: 15% off the Designer + the cut sheet.
| Cut sheet | First job: list → you pay | Later job: list → you pay |
|---|---|---|
| Standard $100 | 50 + 100 + 100 = $250 → $212.50 | 100 + 100 = $200 → $170 |
| Cut up $200 | $350 → $297.50 | $300 → $255 |
| Custom $300 | $450 → $382.50 | $400 → $340 |
How it shows up (one rule)
You buy the two parts one at a time. The part that completes the pair takes the whole discount.
First job, Standard
 Designer bought first ......... $100.00
 Cut sheet, list $100 .......... − $37.50 (15% of 50 + 100 + 100)
 Cut sheet charged ............. $62.50
 With the $50 month ............ $212.50
Either order gives the same total. Once per job: a second cage on the same job is full price.
Steps
| # | Where | What you see |
|---|---|---|
| 1 | Estimator on (Billing) | — |
| 2 | Job → Add 3D to this job — $100 → tick → Yes, add it — $100 | no discount yet: nothing to complete |
| 3 | Cage Layout Pro → the cut sheet button | the price already has the 15% in it, with a line saying what was taken off |
| 4 | press it | charged exactly the price shown. If the price moved between look and press, nothing is charged and the new price shows |
| 5 | Stripe invoice | "Standard · … · Cage Layout Pro · Complete 15% off (−$37.50)" $62.50 |
When there is NO discount (and the page says why)
| Case | Words |
|---|---|
| No Estimator | "Complete is for Estimator customers — the Estimator is not on for this account" |
| Only one part on the job | "no 3D Designer on this job yet" / "no cut sheet on this job yet" |
| Already taken on this job | "the Complete discount was already taken on this job" |
| The discount not set up on our side | the purchase is refused: "The Complete discount is not set up. Nothing has been charged" |
Buying 3D and cut sheets
What it is
The 3D Designer and the cut sheet are bought per job, from inside the job. The price is on the button before you press it. Nothing is charged until you press.
| What | Price | Where you buy it |
|---|---|---|
| Cage Estimator Pro | $50 a month | Billing |
| 3D Designer | $100 a job | The job in the Estimator → Add 3D to this job |
| Cut sheet (Cage Layout Pro) | Standard $100 · Cut up $200 · Custom $300 — set by the layout work | Cage Layout Pro, after the measure |
| Complete | All three on the same job: 15% off — taken off by itself | — |
The prices here are the ones on the Pricing page. The button on the job always shows the price you will pay.
The rules
- A card on file first. Billing → add a card. Saving a card charges nothing.
- The price is shown before you buy. It is on the button.
- A cage Cage Layout Pro can't lay out yet is turned down before any charge — in plain words, and you are not charged. It covers the cage shapes contractors build most.
- Fix a measurement and re-run the same cage: free. One charge per cage.
- When the money is taken: it goes on your next invoice — with the Estimator plan, on the plan's renewal; without it, on the 1st of the month, to the saved card. Stripe e-mails the receipt.
Buy 3D for a job
- Open the job in the Estimator.
- Press Add 3D to this job — $100.
- Read the box, then press Yes, add it — $100. The 3D Designer opens on that job.
Buying 3D locks the job's deck — its size and shape. The roof, zones, heights, doors and screens stay free to change. A bigger deck needs 3D bought again for that job.
Buy a cut sheet
- Open Cage Layout Pro on the job and do the measure.
- Read THIS LAYOUT: the kind of cut (Standard, Cut up or Custom) and its price.
- Press Get the cut sheet — $…. The sheet opens to print.
A cage in two pieces
Some cages are built as two pieces that share an edge — for example a mansard at the back and a gable strip across the front, each with its own beam direction. Draw it the same way:
- Draw the first piece: Draw it instead → click its corners → Show it.
- More roof tools. A STRUCTURES bar shows at the top.
- + ADD → + Screen Cage. A new, empty piece starts.
- Draw the second piece from a corner of the first, along the shared edge → Show it. Joins show under CONNECTIONS.
- Click a piece's name on the STRUCTURES bar to go back to it.
On a job with 3D bought: all the pieces together must be the bought deck. Until the last piece is drawn the page may say Not saved — that is normal. It saves once the whole cage is there.
The mistakes people make
- No card on file — the button sends you to Billing first.
- Changing the deck after buying 3D. Change the roof, heights, doors and screens — not the deck.
- Drawing a two-piece cage as one shape with a divider when the beams run different ways. Use + ADD for the second piece.
Charged wrong? Email [email protected] with the job number.
Easy entry — a cut sheet one question at a time
What it is
The same measure as the full Layout page, asked one question per page with big buttons. Good for a measurer on a phone. Whatever you type lands in the same job.
Steps
- Open Cage Layout Pro on the job → Easy entry (top of the page).
- Answer each page, then Next ›: which job · what shape · which sides are against the house · each side's tape · the crosses · the TBSG · what roof · doors · picture windows · bays and grid · sizes off the engineering.
- Check it, then print. The cage is laid out: ✓ Laid out — N pieces. If something is missing or will not lay out, this page says what, with a Fix button to that page.
- See the price → the same price card as the full page. You pay only after you see it. Make the cut sheet shows once the sheet is bought.
The mistakes people make
- Skipping a cross. Pull every cross the page asks for — the square of the deck comes from them.
- A whole-wall picture window longer than one stick with no posts. On the picture windows page press + Add a post and tape where each post goes.
Draw any cage
What it is
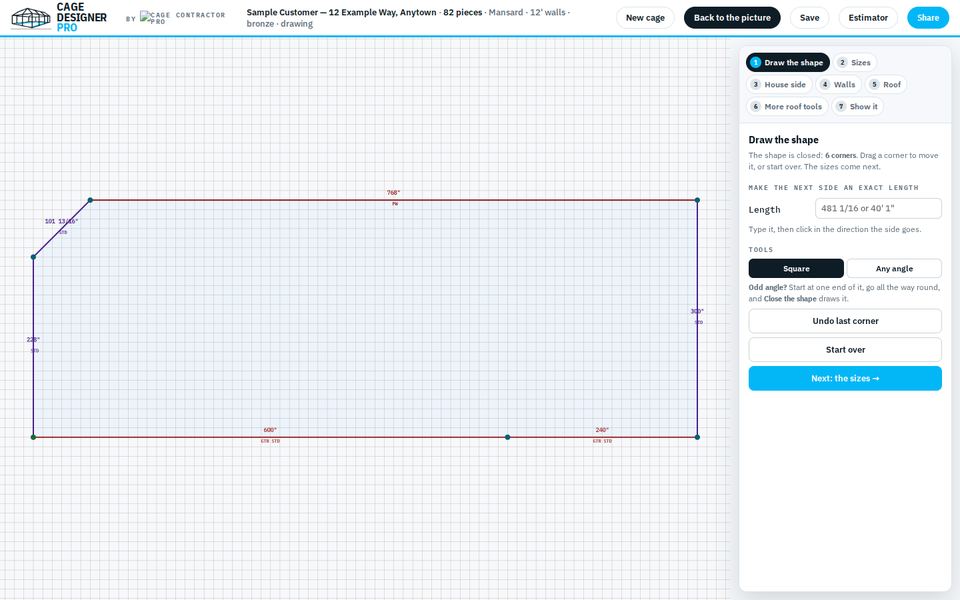
Any shape of cage, drawn by clicks in the 3D Designer: angles, a low part of the house, a picture window, two roofs. Six steps. Pictures are from a made-up cage (70' x 25', one cut corner).
Steps
Step 1 — The outline
Not four-sided? Draw the deck (or Draw it instead on a cage you have) → click each corner going round, or type a Length and click the way the side goes. Odd angle? Start at one end of it, go all the way round, and Close the shape draws it.
Step 2 — The house sides
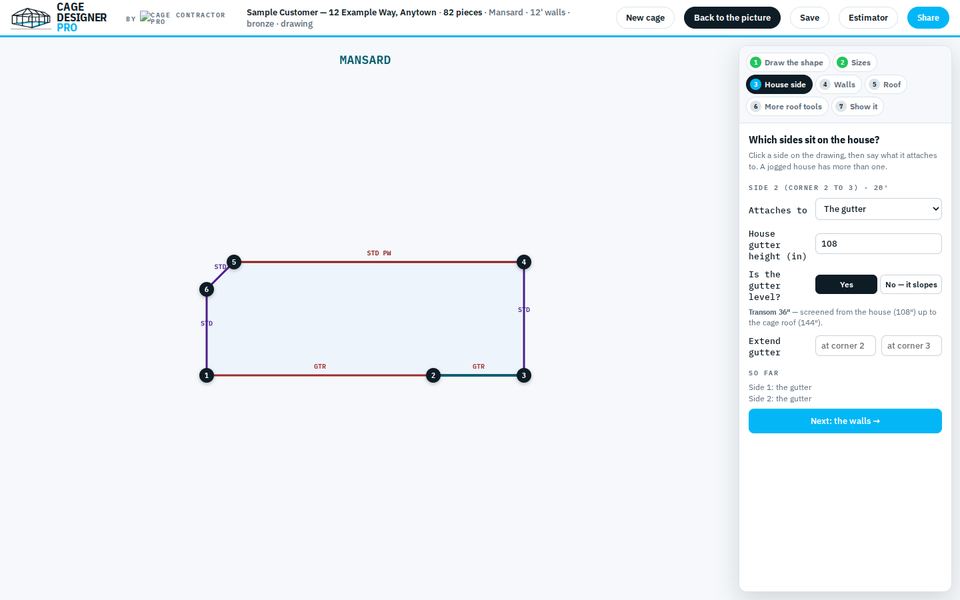
House side → click a side on the house → Attaches to: The gutter (or The fascia). House gutter height: leave it blank for a normal gutter (its top 3" above the walls). Only type a number when the gutter sits higher or lower — type the gutter top less 3. Lower than the cage walls? The note says Transom — a screened wall from the house up to the cage roof.
The gutter is structural: it carries the side walls, so there is no post under the gutter where a side wall meets it, and the side wall's chair rail runs on to the house wall. A transom wall is only built where a roof beam ends above what is under it.
Step 3 — Walls and picture windows
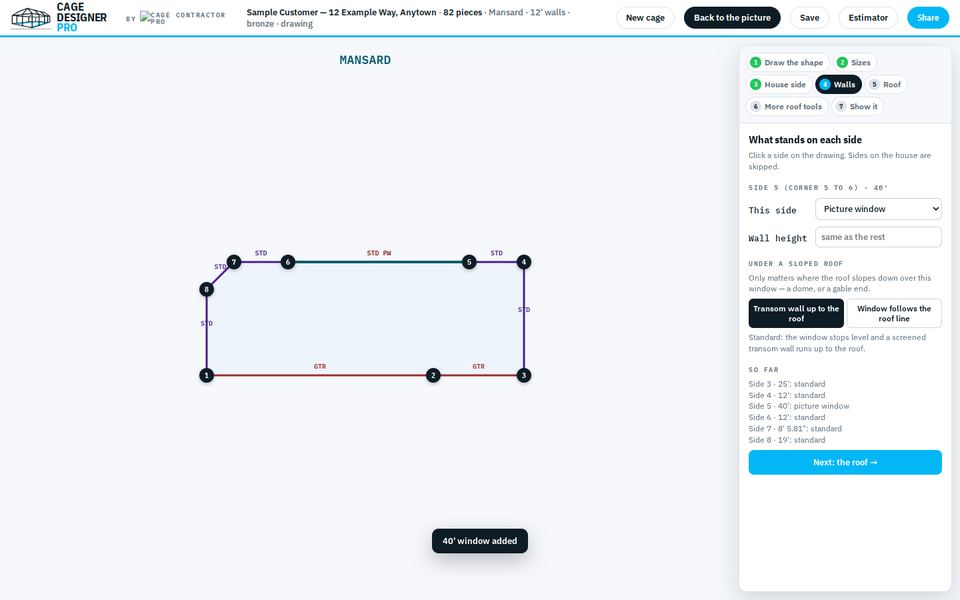
Walls → click a side → pick what fills it. For a window in part of a side: A picture window in this side → width → where → Add the window.
Step 4 — Two roofs on one cage
Two roofs belong where the deck steps in: the narrower part forces the change. More roof tools → TOOLS → Roof → + ADD DIVIDER → click the corner where the deck steps, then the side across from it. The divider lands on the corner or the dashed bay line. Pick each zone's roof in the list — for example Gable over the wide part and Mansard over the narrow part.
Step 5 — Show it
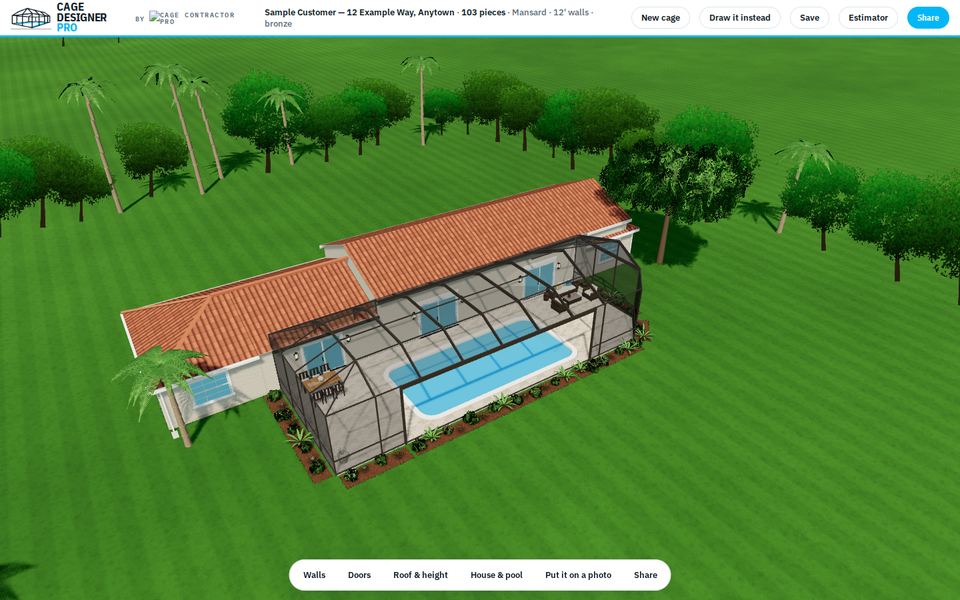
Show it → the cage in 3D on a house. Drag with the mouse to turn it.
Step 6 — Save
Save (top right) → "Saved to the company". The cage, its sizes and its pictures stay on the job.
Roof by roof
Pick the roof on the Roof step (or Roof & height on a typed cage). Every roof gets corner jacks at the free corners and one chair rail at 36".
| Roof | What to give it |
|---|---|
| Mansard | Nothing more. Hips down every side. |
| Half mansard | Nothing more. The flat sits on the gutter and slopes down to the front wall. |
| Reverse half mansard | Nothing more. The face is at the house, the flat runs out to the front. |
| Gable A | Ends: gable ends (an A-frame at each end wall) or hip down. |
| Gable F (follows the house gable) | The house gable: left corner, right corner, peak and where the peak is. The gutter follows the gable. |
| Flat | Nothing more. |
| Shed | Slopes away from the house. Give the slope one way: inches per foot, or height at the house and height at the front. The other is worked out. Blank = the standard slope. |
| Dome | More roof tools → TOOLS → Roof → pick Dome for the zone → its rise. |
Corner jacks (Roof step): on by default — they keep the cage from twisting in high wind. Turn them off only when the job says so.
A second chair rail on a tall wall (over 13'): More roof tools → TOOLS → Advanced → CHAIR RAILS → MANUAL → type the heights → APPLY CHAIR RAILS.
The mistakes people make
- Drawing the angle in the middle of the shape. Start at one end of it — Close the shape draws it for you.
- Leaving a low house section at the cage height. Type its own House gutter height — that is what makes the transom.
- Putting a divider beside a corner. Click on the corner itself — the corner wins.
- Typing the measured gutter top in the gutter box. A normal gutter is left blank; the box takes the gutter top less 3.
Doors, rails, split beams and joints
What it is
Four things you can now set in Cage Designer Pro. Each one changes the pieces the cage is drawn with, and the estimate.
Doors
- Show the cage. Tap Doors under the picture.
- Pick the Wall, the Door size and where to Put it.
- Door: Standard has a kick plate and a push bar. Welded is the 2" frame only, welded.
- Posts up to: Door header (the usual) runs across the top of the door, wall post to wall post. The door posts stop under it. Rail / beam runs the door posts up to the rail above (on a picture-window wall, the beam).
- Door pad: Match deck puts a pad outside the door, the same as the deck.
- Tap Add the door.
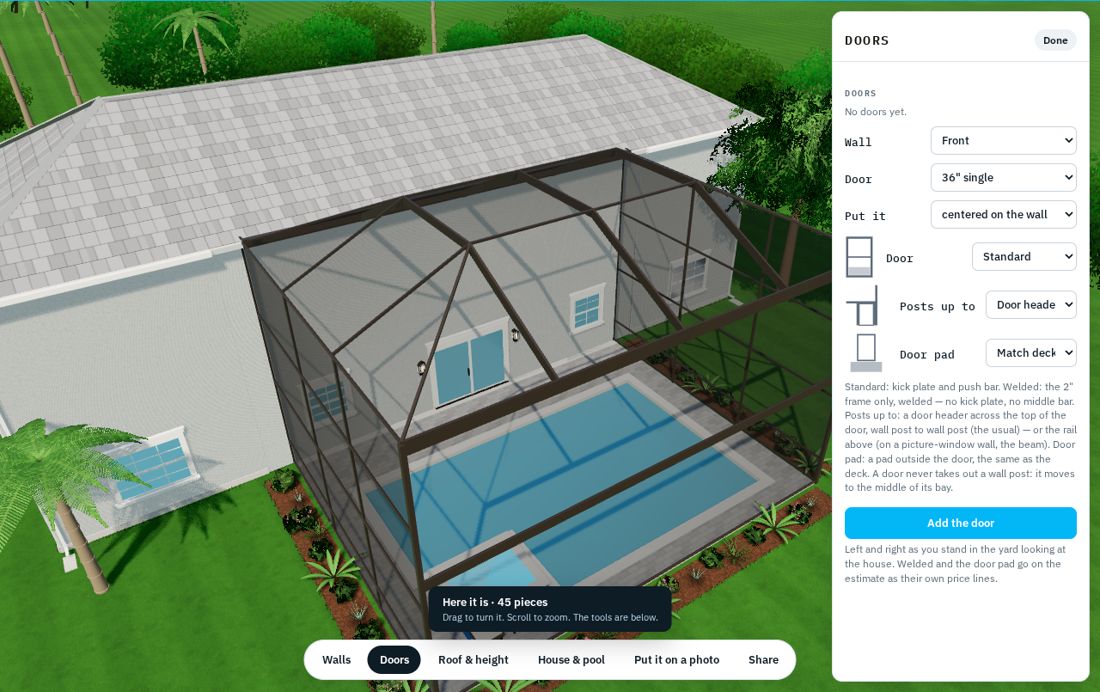
A door never takes out a wall post. If the spot you picked is on a post, the door moves to the middle of that bay and the message says how far. Welded and the door pad each go on the estimate as their own line.
Rails
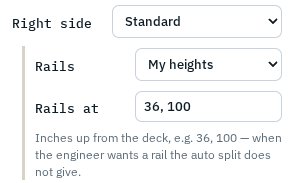
- Tap Walls. Under each side, Rails is Auto (even split).
- When the engineer wants rails somewhere else, pick My heights and type the heights in inches up from the deck, for example 36, 100.
Split beam (picture-window walls)
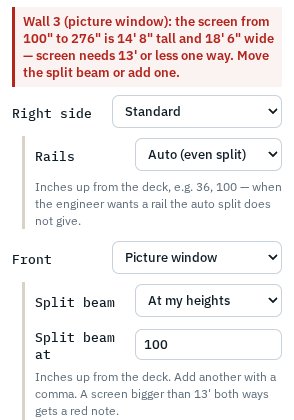
- Make the side a Picture window. Split beam shows under it, set to Auto.
- To put it at your own height, pick At my heights and type inches up from the deck, for example 120. Add another with a comma.
- A red line means a screen panel is over 13' both ways. Move the split beam or add one until the red line goes away.
Two cages joined by a carry beam
- Tap Draw it instead, then More roof tools.
- Under Posts under the carry beam, each joint has its own choice: None — clear span (posts only at its ends) or Every 8'.
No post goes at a house corner. You can still add one post by hand.
The mistakes people make
- Setting Rail / beam on a tall wall. The door posts then run all the way up. Use Door header.
- Typing feet in the height boxes. They take inches up from the deck: 8' 4" is 100.
- Leaving a red line. The screen panel is too big to build. Move the split beam until it goes away.